
There’s something magical about the combination of crispy chicken, smoky bacon, and tangy ranch dressing all wrapped up in a warm tortilla. I’ve spent years perfecting this recipe, and today I’m thrilled to share my ultimate crispy chicken bacon ranch wrap with you. This isn’t just any wrap—it’s a flavor explosion that will revolutionize your lunch routine and have your family requesting it again and again.
Why This Wrap Will Change Your Life
I remember the first time I tried to make a chicken wrap at home. It was a soggy, flavorless disaster that fell apart with the first bite. After numerous attempts and countless adjustments, I’ve finally cracked the code to creating the perfect wrap that stays together, maintains its crispiness, and delivers incredible flavor in every bite.
The secret lies in the preparation method for the chicken, the order of ingredients, and a few special techniques I’ll share with you today. Whether you’re meal prepping for the week ahead or throwing together a quick dinner, this recipe is versatile, satisfying, and absolutely delicious.
Ingredients You’ll Need
For this show-stopping wrap, gather the following ingredients for 4 servings:
For the Crispy Chicken:
- 2 large boneless, skinless chicken breasts (approximately 1 pound)
- 1 cup buttermilk
- 1 tablespoon hot sauce (optional, but recommended)
- 1½ cups all-purpose flour
- 1 tablespoon garlic powder
- 1 tablespoon onion powder
- 2 teaspoons paprika
- 1 teaspoon cayenne pepper (adjust to your heat preference)
- 2 teaspoons salt
- 1 teaspoon freshly ground black pepper
- Vegetable or canola oil for frying
For the Homemade Ranch Dressing:
- ½ cup sour cream
- ¼ cup mayonnaise
- 2 tablespoons buttermilk
- 1 tablespoon fresh dill, finely chopped
- 1 tablespoon fresh parsley, finely chopped
- 1 tablespoon fresh chives, finely chopped
- 1 garlic clove, minced
- 1 teaspoon lemon juice
- ½ teaspoon Worcestershire sauce
- ¼ teaspoon salt
- ¼ teaspoon black pepper
For Assembly:
- 4 large burrito-sized tortillas (10-12 inch)
- 8 slices bacon, cooked until crispy
- 2 cups romaine lettuce, shredded
- 1 cup cherry tomatoes, halved
- 1 avocado, sliced
- ¼ red onion, thinly sliced
- 1 cup cheddar cheese, shredded
Equipment Essentials
The right tools make all the difference when preparing this wrap:
- Heavy-bottomed skillet or Dutch oven
- Meat thermometer
- Wire cooling rack
- Mixing bowls (various sizes)
- Sharp knife
- Cutting board
- Tongs
- Paper towels
- Aluminum foil (for keeping tortillas warm)
Preparation Method: Step-by-Step
Step 1: Prepare the Chicken Marinade
I always start with marinating the chicken because this step is crucial for maximum flavor and tenderness.
- Slice the chicken breasts horizontally into thinner cutlets, about ½-inch thick. This ensures quick, even cooking and the perfect chicken-to-other-ingredients ratio in your wrap.
- In a large bowl, combine the buttermilk and hot sauce.
- Add the chicken pieces to the buttermilk mixture, ensuring they’re fully submerged.
- Cover and refrigerate for at least 1 hour, or ideally overnight. This tenderizes the meat and infuses it with flavor.
Step 2: Make the Homemade Ranch Dressing
While store-bought ranch works in a pinch, nothing compares to homemade. The fresh herbs and perfect balance of creaminess make all the difference.
- In a medium bowl, whisk together the sour cream, mayonnaise, and buttermilk until smooth.
- Add the chopped dill, parsley, chives, minced garlic, lemon juice, and Worcestershire sauce.
- Season with salt and pepper, then whisk until well combined.
- Cover and refrigerate for at least 30 minutes to allow the flavors to meld.
Step 3: Cook the Bacon
- Arrange bacon slices in a single layer in a cold skillet (this helps render the fat slowly for perfectly crisp bacon).
- Turn heat to medium and cook, turning occasionally, until the bacon is crispy, about 8-10 minutes.
- Transfer to a paper towel-lined plate to drain excess fat.
- Once cooled, break each slice in half for easier wrapping.
Step 4: Prepare the Crispy Chicken
Now comes the star of our wrap—perfectly crispy chicken that stays crunchy even when wrapped.
- In a shallow dish, combine the flour, garlic powder, onion powder, paprika, cayenne pepper, salt, and black pepper.
- Remove the chicken from the buttermilk marinade, allowing excess to drip off.
- Dredge each piece thoroughly in the seasoned flour mixture, pressing gently to adhere.
- In a large, heavy-bottomed skillet or Dutch oven, heat about 1 inch of oil to 350°F (175°C).
- Carefully add the chicken pieces to the hot oil, working in batches to avoid overcrowding.
- Fry until golden brown and cooked through, about 3-4 minutes per side, or until the internal temperature reaches 165°F (74°C).
- Transfer to a wire rack set over a baking sheet to maintain crispiness while you finish cooking.
- Once all chicken is cooked, let it rest for 5 minutes, then slice into strips.
Step 5: Warm the Tortillas
Properly warmed tortillas are more pliable and less likely to tear when wrapping.
- Wrap the stack of tortillas in aluminum foil.
- Place in a preheated 300°F (150°C) oven for about 5 minutes until warm and flexible.
- Keep wrapped until ready to assemble to maintain warmth and flexibility.
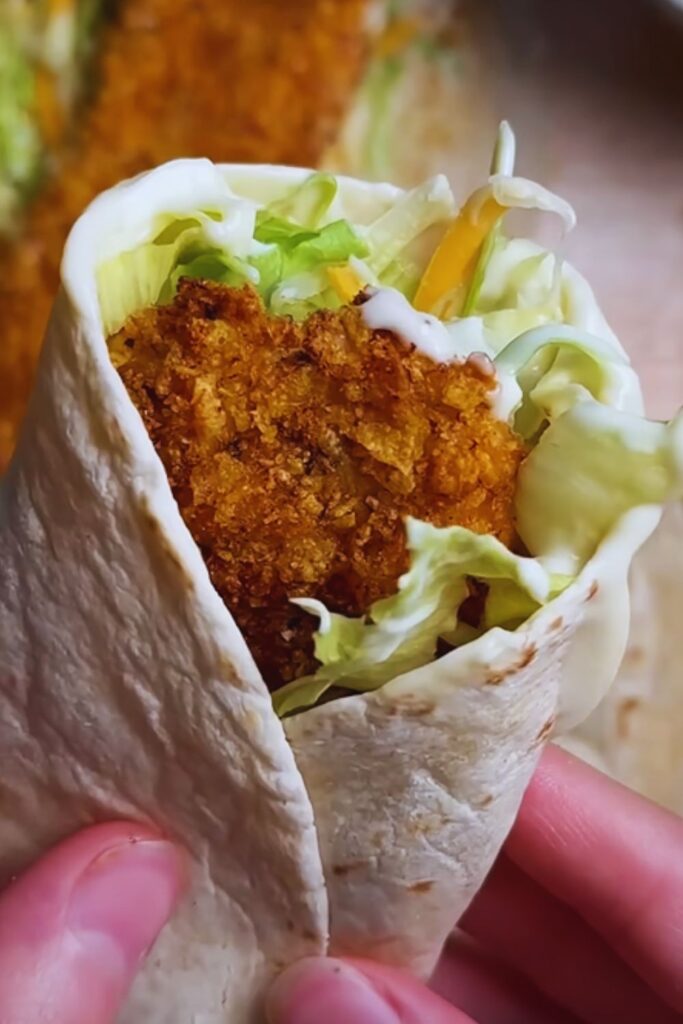
Step 6: Assemble Your Wraps
The order of ingredients is crucial for structural integrity and flavor distribution.
- Lay a warm tortilla flat on your work surface.
- Spread about 2 tablespoons of ranch dressing in the center of the tortilla, leaving about a 2-inch border.
- Add a layer of shredded lettuce on top of the ranch.
- Arrange chicken strips down the center.
- Add 2 pieces of bacon (4 halves) alongside the chicken.
- Top with cherry tomatoes, avocado slices, red onion, and shredded cheddar cheese.
- Drizzle with an additional tablespoon of ranch dressing.
Step 7: Master the Wrapping Technique
Here’s where many home cooks go wrong—proper wrapping technique is essential!
- Fold the bottom edge of the tortilla up and over the filling.
- Fold in the sides toward the center, creating an envelope.
- While holding the sides in place, roll the wrap away from you, keeping it tight as you go.
- If desired, secure with toothpicks or wrap in parchment paper or foil for easier handling.
Step 8: (Optional) Toast for Extra Crispiness
For an extra-special touch, I sometimes give my wraps a quick toast:
- Heat a clean skillet over medium heat.
- Place the wrapped tortilla, seam-side down, in the skillet.
- Cook for 1-2 minutes per side until golden and crispy.
- Remove from heat and let cool slightly before cutting.

Nutritional Information
Understanding the nutritional content helps you make informed choices about portion sizes and meal planning. Here’s a breakdown per wrap:
| Nutrient | Amount per Serving | % Daily Value* |
|---|---|---|
| Calories | 820 | – |
| Total Fat | 42g | 54% |
| Saturated Fat | 14g | 70% |
| Trans Fat | 0g | – |
| Cholesterol | 125mg | 42% |
| Sodium | 1,480mg | 64% |
| Total Carbohydrates | 54g | 20% |
| Dietary Fiber | 6g | 21% |
| Sugars | 4g | – |
| Protein | 52g | 104% |
| Vitamin A | 1,200 IU | 24% |
| Vitamin C | 15mg | 17% |
| Calcium | 320mg | 32% |
| Iron | 4mg | 22% |
*Percent Daily Values are based on a 2,000 calorie diet.
Variations to Keep Things Interesting
Once you’ve mastered the basic recipe, try these exciting variations:
Spicy Southwest Version
- Add sliced jalapeños
- Substitute pepper jack for cheddar
- Include a layer of black beans
- Mix chipotle powder into the ranch dressing
- Add fresh cilantro and lime juice
Mediterranean Twist
- Use Greek yogurt instead of sour cream in the ranch
- Add cucumbers and kalamata olives
- Include crumbled feta instead of cheddar
- Add a spread of hummus before the ranch layer
- Season chicken with oregano and lemon zest
Breakfast Wrap Version
- Add scrambled eggs
- Use breakfast sausage instead of chicken
- Include hash browns for extra texture
- Add a drizzle of maple syrup (trust me!)
Low-Carb Option
- Use a large lettuce leaf instead of a tortilla
- Increase the cheese for binding
- Add extra avocado for healthy fats
- Serve with additional ranch on the side for dipping
Make-Ahead and Storage Tips
These wraps are perfect for meal prep with the right approach:
Make-Ahead Components
I often prepare components separately and store them properly for quick assembly throughout the week:
- Crispy chicken: Fry and cool completely, then refrigerate in an airtight container with paper towels between layers to maintain crispiness. Reheat in a 350°F (175°C) oven for 10 minutes before using.
- Ranch dressing: Stores well for up to 5 days in the refrigerator.
- Washed and prepped vegetables: Store in separate containers lined with paper towels to absorb excess moisture.
- Cooked bacon: Refrigerate for up to 3 days or freeze for longer storage.
Fully Assembled Wraps Storage
If you want to make complete wraps in advance:
- Wrap tightly in parchment paper, then in aluminum foil.
- Refrigerate for up to 24 hours.
- For best results, don’t add lettuce, tomatoes, or avocado until ready to eat to prevent sogginess.
Freezing Instructions
You can freeze components or partially assembled wraps:
- Freeze cooked chicken and bacon separately.
- Thaw overnight in the refrigerator before reheating.
- Never freeze ranch dressing or fresh vegetables as they’ll lose texture.
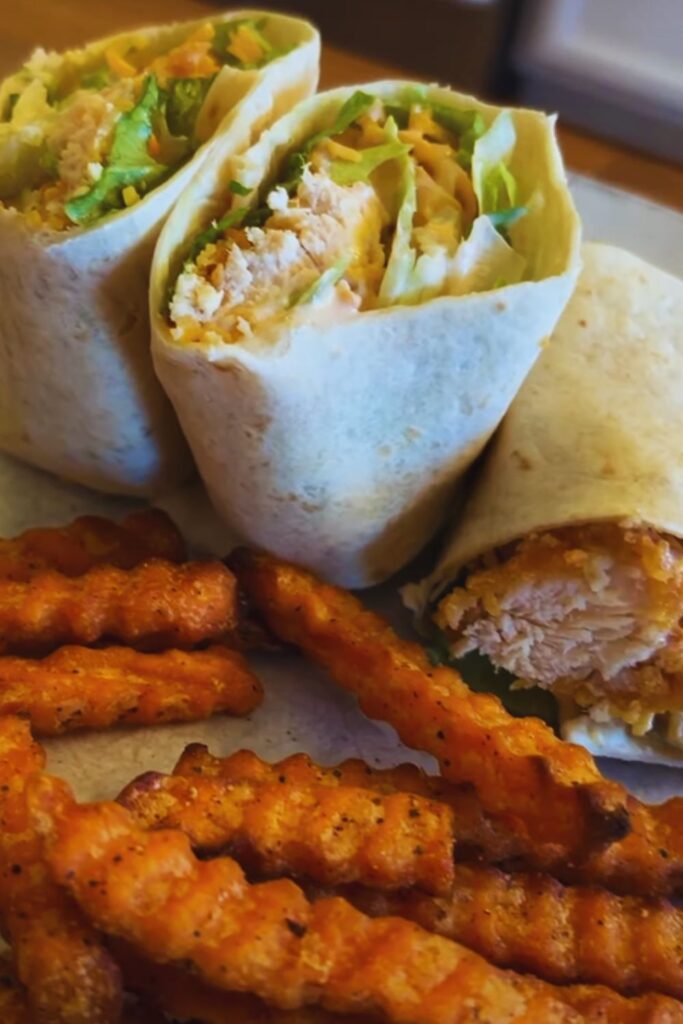
Serving Suggestions
Take your meal to the next level with these complementary sides:
- Sweet potato fries with chipotle aioli
- Fresh fruit salad with mint and honey
- Crunchy coleslaw with apple cider vinegar dressing
- Roasted vegetable quinoa salad
- Pickle spears for added crunch and acidity
- Homemade potato chips seasoned with ranch powder
Common Mistakes to Avoid
Over my years of wrap-making, I’ve identified these common pitfalls:
- Overstuffing the wrap: This leads to difficult rolling and ingredients falling out. Start with less filling than you think you need.
- Using cold tortillas: They crack and split when folded. Always warm them first.
- Improper ingredient order: Placing wet ingredients directly against the tortilla causes sogginess. Create a barrier with lettuce first.
- Cutting immediately after wrapping: Let the wrap set for a minute before cutting to allow it to seal.
- Not patting ingredients dry: Excess moisture is the enemy of a good wrap. Pat tomatoes, lettuce, and other wet ingredients with paper towels.
Specialized Techniques for Extra-Crispy Chicken
For those who want to elevate their chicken game even further:
Double-Dredge Method
- After the first flour coating, dip the chicken back into the buttermilk, then into the flour again.
- This creates extra nooks and crannies for a shatteringly crisp crust.
Air Fryer Option
- Spray coated chicken with cooking oil spray.
- Air fry at 400°F (200°C) for 12-15 minutes, flipping halfway.
- This reduces oil but still creates a wonderfully crispy exterior.
Cost Breakdown and Budget Tips
Making these wraps at home is economical, especially when feeding a family:
| Ingredient | Approximate Cost | Budget Alternative |
|---|---|---|
| Chicken breasts | $5.00 | Use chicken thighs ($3.00) |
| Bacon | $4.50 | Turkey bacon ($3.00) or omit |
| Buttermilk | $2.00 | Make your own with milk + lemon juice ($0.50) |
| Fresh herbs | $4.00 | Use dried herbs ($1.00) |
| Large tortillas | $3.00 | Make your own from scratch ($1.00) |
| Cheese | $2.50 | Use less or omit |
| Avocado | $1.50 | Use guacamole or omit |
| Other vegetables | $3.50 | Use seasonal options or what’s on sale |
| Total for 4 wraps | $26.00 | $15.00 with substitutions |
| Cost per wrap | $6.50 | $3.75 with substitutions |
Compare this to restaurant versions that typically cost $12-15 each!
Time-Saving Shortcuts
For busy weeknights, try these time-savers that don’t sacrifice too much quality:
- Use pre-cooked rotisserie chicken, shredded and quickly crisped in a hot skillet with spices.
- Substitute store-bought ranch dressing (look for refrigerated versions for better quality).
- Use pre-cooked bacon or bacon bits in a pinch.
- Purchase pre-shredded cheese and lettuce.
- Make a big batch on the weekend and assemble throughout the week.
Why This Recipe Works: The Science Behind It
Understanding the food science helps you achieve consistent results:
- Buttermilk marinade: The acidity tenderizes the chicken by breaking down proteins while the fat adds moisture.
- Hot oil temperature: 350°F (175°C) is the sweet spot where the exterior browns quickly before the interior dries out.
- Resting the chicken: Allows juices to redistribute, preventing dry meat and soggy wraps.
- Barrier ingredients: Lettuce creates a moisture barrier between wet ingredients and the tortilla.
- Cheese placement: Placing cheese near warm ingredients helps it melt slightly, creating a binding effect.
Questions & Answers
Q: Can I make these wraps gluten-free? Yes! Use gluten-free tortillas and substitute the all-purpose flour in the chicken coating with a gluten-free flour blend or cornstarch. Just be sure to check your Worcestershire sauce, as some brands contain gluten.
Q: How can I make this recipe dairy-free? Replace the buttermilk with a mixture of dairy-free milk and 1 tablespoon of lemon juice or vinegar. For the ranch dressing, use dairy-free yogurt and mayonnaise. Omit the cheese or use a dairy-free alternative.
Q: What’s the best way to transport these wraps for lunch without them getting soggy? Wrap them tightly in parchment paper, then in aluminum foil. Keep cold ingredients separate in small containers and assemble just before eating. Alternatively, toast the assembled wrap before packing to create a barrier against moisture.
Q: Can children help make this recipe? Absolutely! Kids can help mix the ranch dressing, layer ingredients on the tortilla, and practice wrapping skills. For safety, adults should handle the hot oil frying and cutting tasks.
Q: Is there a way to reduce the calories in this wrap? Yes, several modifications can lower the calorie count:
- Use chicken breast without breading and grill instead of fry
- Swap full-fat dairy for light versions in the ranch
- Use turkey bacon instead of pork bacon
- Choose a smaller or lower-carb tortilla
- Increase the vegetable proportion and decrease the meat and cheese
Q: How spicy is this recipe as written? The recipe has a mild to medium heat level from the cayenne and hot sauce. For a milder version, reduce or omit these ingredients. For extra heat, add diced jalapeños or a spicier hot sauce.
Q: What’s the most common reason my chicken doesn’t get crispy enough? The most likely culprit is overcrowding the pan when frying. Work in batches so the chicken pieces don’t touch, which allows steam to escape and crispiness to develop. Also, make sure your oil maintains a consistent temperature of 350°F (175°C).
Q: Can I use this same chicken recipe for other dishes? Absolutely! This crispy chicken works beautifully in salads, on sandwiches, as chicken tenders with dipping sauce, or as the protein in grain bowls. It’s versatile and delicious in many applications.
I hope this comprehensive guide helps you create the perfect crispy chicken bacon ranch wrap! With these techniques and insights, you’ll be able to customize the recipe to your preferences while maintaining the perfect balance of flavors and textures that make this wrap so irresistible.

