
There’s something magical about a perfectly executed New York cheesecake. That first bite – where the fork glides through the velvety cream cheese filling before hitting the buttery graham cracker crust – is a moment of pure culinary bliss. I’ve spent years perfecting my technique, and today I’m sharing my foolproof method for creating the ultimate New York-style cheesecake that will have your guests convinced you’ve been hiding professional pastry chef credentials.
A Bite of History
Before diving into my recipe, let’s appreciate where this iconic dessert came from. While cheesecake has ancient origins dating back to Greece, the New York-style version we know and love today was born when German immigrants brought their käsekuchen recipes to America. The game-changer came in 1872 when a dairy farmer named William Lawrence accidentally created cream cheese while attempting to replicate a French cheese. This happy accident eventually led to the creation of Philadelphia cream cheese, the foundation of modern New York cheesecake.
What distinguishes New York cheesecake from other varieties is its dense, rich, and smooth texture. Unlike Italian or French versions that use ricotta or Neufchâtel, the New York style relies heavily on cream cheese with a touch of sour cream or heavy cream for that signature tanginess and velvety mouthfeel.
Why This Recipe Works
After countless tests (and some memorable failures), I’ve identified the key factors that make or break a New York cheesecake:
- Room temperature ingredients: This is non-negotiable for achieving that silky-smooth texture
- Low and slow baking: Patience is your friend for preventing cracks
- Proper cooling technique: The gradual temperature change prevents the dreaded center collapse
- Overnight refrigeration: This isn’t just for setting the cake but for developing complex flavors
My technique incorporates all these crucial elements while eliminating common pitfalls. The result? A foolproof method that delivers consistent, restaurant-quality results every single time.
Essential Equipment
Before starting, make sure you have these tools on hand:
- 9-inch springform pan
- Stand mixer or powerful hand mixer
- Food processor (for the crust)
- Large roasting pan (for the water bath)
- Heavy-duty aluminum foil
- Instant-read thermometer (optional but helpful)
Ingredients Breakdown
Let’s look at what goes into making the perfect cheesecake:
For the Graham Cracker Crust:
- 2 cups graham cracker crumbs (about 15-16 full sheets)
- 1/3 cup granulated sugar
- 8 tablespoons (1 stick) unsalted butter, melted
- 1/4 teaspoon kosher salt
For the Cheesecake Filling:
- 32 ounces (4 blocks) full-fat cream cheese, room temperature
- 1 1/2 cups granulated sugar
- 1/3 cup sour cream, room temperature
- 2 teaspoons pure vanilla extract
- 1 teaspoon fresh lemon juice
- 5 large eggs, room temperature
- 2 large egg yolks, room temperature
- 2 tablespoons all-purpose flour (optional but helps with stability)
Critical Ingredient Notes
Understanding your ingredients is the first step toward cheesecake mastery:
Full-fat cream cheese : Accept no substitutes! Low-fat versions contain stabilizers that affect texture and melting properties. Philadelphia brand is my go-to for its consistent quality and authentic flavor.
Room temperature ingredients : This isn’t just chef pretentiousness—cold cream cheese will never fully incorporate, leading to lumps and uneven baking.
Sour cream : Adds that signature New York tanginess while contributing to a silky texture. Full-fat Greek yogurt can work in a pinch.
Fresh lemon juice : Just a touch brightens the flavor without making it lemony. Fresh is essential; bottled lacks the same brightness.
Vanilla extract : Use pure, not imitation. The flavor is subtle but builds the foundation of the cheesecake’s profile.
The Method: Step by Step
Preparing the Crust
- Preheat your oven to 350°F (175°C).
- Wrap the outside of your springform pan with two layers of heavy-duty aluminum foil, making sure it comes up the sides at least 2 inches. This prevents water from seeping in during the water bath phase.
- In a food processor, pulse graham crackers until finely ground.
- Add sugar and salt to the crumbs and pulse to combine.
- With the processor running, drizzle in melted butter until the mixture resembles wet sand.
- Press the mixture firmly into the bottom and about 1-1.5 inches up the sides of your springform pan. I use the flat bottom of a measuring cup for even compaction.
- Bake for 10 minutes until lightly golden and fragrant.
- Remove and let cool completely while preparing the filling.
- Reduce oven temperature to 325°F (165°C).

Creating the Perfect Filling
- In the bowl of a stand mixer fitted with the paddle attachment, beat cream cheese on medium-low speed for 4-5 minutes until completely smooth. Stop and scrape down the bowl and paddle several times.
- Gradually add sugar and continue beating for another 2 minutes until the mixture is silky and no cream cheese lumps remain.
- Add sour cream, vanilla extract, and lemon juice. Beat on low speed until just combined.
- Add eggs and egg yolks one at a time, mixing on low speed just until each is incorporated. Do not overmix after adding eggs—this introduces air bubbles that can cause cracks.
- If using flour, sprinkle it over the mixture and beat on low for 10 seconds just until incorporated.
- Pour the batter onto the cooled crust.
The Water Bath Technique (Bain-Marie)
The water bath is crucial for gentle, even baking. Here’s how to do it right:
- Place your foil-wrapped cheesecake in a large roasting pan.
- Place the pan in the oven and carefully pour hot water into the roasting pan until it reaches about 1 inch up the sides of the springform pan.
- Bake for 1 hour and 15 minutes. The cheesecake should still have a 2-3 inch wobbly center when gently shaken.
- Turn off the oven, crack the door open about 1 inch, and let the cheesecake cool in the oven for 1 hour. This gradual cooling prevents cracks.
- Remove from the oven and water bath, carefully peel away the foil, and let cool completely on a wire rack (about 2-3 hours).
- Once at room temperature, refrigerate for at least 8 hours, preferably overnight. Trust me, this wait is essential for flavor development!
Troubleshooting Common Issues
| Problem | Likely Cause | Prevention |
|---|---|---|
| Cracks on the surface | Overmixing the batter, especially after adding eggs | Mix on low speed just until ingredients are incorporated |
| Cracks on the surface | Baking at too high a temperature | Use an oven thermometer to verify temperature accuracy |
| Cracks on the surface | Sudden temperature changes | Cool gradually in the oven with door cracked open |
| Sunken middle | Opening the oven during baking | Resist the urge to peek! |
| Sunken middle | Underbaking | Check for proper jiggle – only the center 2-3 inches should wobble slightly |
| Lumpy batter | Cold ingredients | Allow all ingredients to come to room temperature (at least 2 hours) |
| Soggy crust | Water bath leakage | Use multiple layers of heavy-duty foil and check for tears |
| Browned top | Oven too hot or positioned too high | Bake in the middle rack and verify oven temperature |
| Cheesecake sticking to pan | Not preparing the pan properly | Consider lightly greasing sides or using parchment paper |
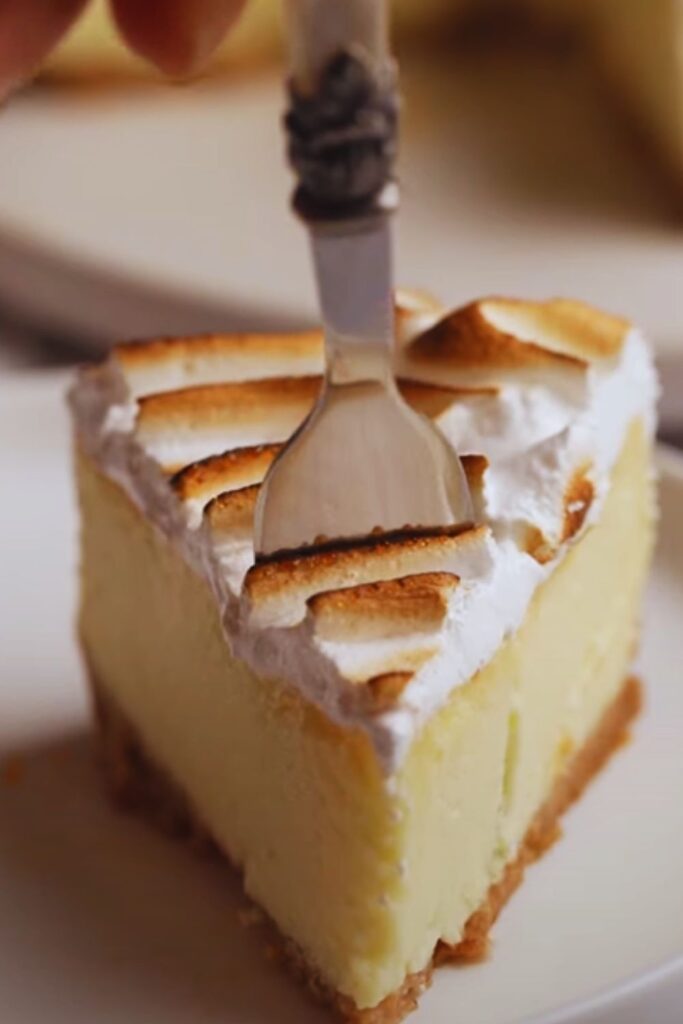
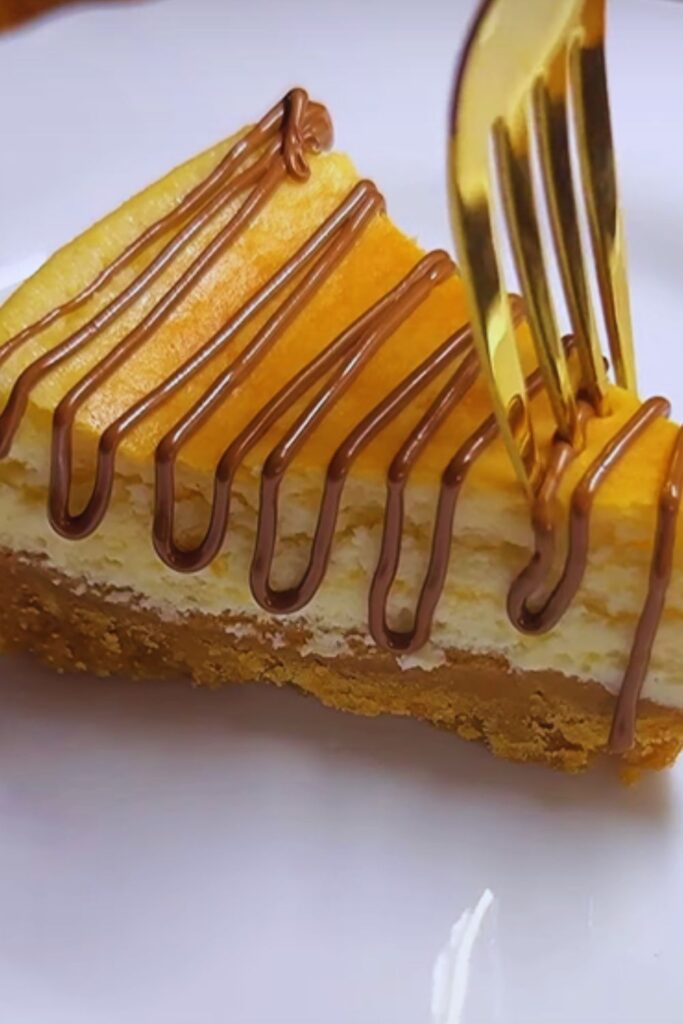
Serving Suggestions and Variations
The classic New York cheesecake is perfect on its own, but here are some delicious ways to elevate it:
Toppings:
- Fresh berries (strawberries, raspberries, blueberries)
- Lightly sweetened whipped cream
- Homemade fruit compote
- Chocolate ganache
- Salted caramel sauce
Flavor Variations:
- Add 2 tablespoons of fresh lemon zest for a lemon cheesecake
- Fold in 1 cup of mini chocolate chips
- Swirl in 1/4 cup of raspberry or strawberry preserves before baking
- Add 2 tablespoons of espresso powder for a coffee-flavored version
- Substitute 1/4 cup of the sugar with maple syrup for a maple cheesecake
Crust Alternatives:
- Chocolate cookie crust (Oreos with the filling removed work beautifully)
- Shortbread cookie crust
- Gingersnap crust (perfect for fall)
- Toasted pecan or walnut and graham cracker mix
Nutritional Information
For those watching their intake (although I believe cheesecake should be an occasional indulgence without guilt), here’s the approximate nutritional breakdown per slice (assuming 12 slices per cake):
| Nutrient | Amount per Slice |
|---|---|
| Calories | 450-500 |
| Total Fat | 32g |
| Saturated Fat | 18g |
| Cholesterol | 165mg |
| Sodium | 300mg |
| Total Carbohydrates | 38g |
| Dietary Fiber | <1g |
| Sugars | 32g |
| Protein | 7g |
Storage and Make-Ahead Tips
One of the best things about cheesecake is that it actually improves with time as the flavors meld:
- Refrigerator: Properly stored in an airtight container, cheesecake will keep for up to 5 days.
- Freezer: For longer storage, cheesecake freezes beautifully for up to 2 months. Wrap individual slices or the whole cake (minus any toppings) in plastic wrap, then aluminum foil. Thaw overnight in the refrigerator.
- Make-ahead: This is an ideal dessert to prepare 1-2 days before a special occasion. The flavor actually improves after 24 hours of refrigeration.
My Secret Tips for Cheesecake Perfection
After years of baking, here are my most cherished insider tips:
- Cream cheese buffer: Reserve 2 tablespoons of cream cheese mixture before adding eggs, then spread it over any cracks that form during baking.
- The tap and swirl: After pouring batter into the pan, gently tap it on the counter several times to release air bubbles, then use a toothpick to pop any that rise to the surface.
- The foil safety net: If you’re worried about water bath leakage, place your foil-wrapped springform pan inside an oven-safe plastic bag with the opening folded down (not touching the batter).
- The magical cooling technique: After turning off the oven, run a thin knife around the edge of the cheesecake to release it from the pan. This prevents pulling and cracking as it cools.
- The perfect slice: Dip your knife in hot water and wipe clean between each cut for restaurant-quality presentation.
The Science Behind the Perfect Cheesecake
Understanding the science helps you make better cheesecake:
| Stage | What’s Happening | Why It Matters |
|---|---|---|
| Room temperature ingredients | Fats in cream cheese become more malleable | Creates a smooth emulsion without overbeating |
| Low mixing after adding eggs | Prevents air incorporation | Air bubbles expand during baking, then collapse, causing cracks |
| Water bath | Creates humid environment and regulates temperature | Ensures gentle, even baking throughout |
| Gradual cooling | Allows proteins to set slowly | Prevents rapid contraction that causes cracks |
| Overnight refrigeration | Fats solidify and flavors develop | Creates ideal dense texture and complex flavor profile |
Q&A Section
Q: Do I really need a water bath? It seems complicated. Yes, it’s worth the extra effort. The water bath provides humidity and ensures even, gentle heat distribution, which is crucial for the perfect texture. If you absolutely must skip it, reduce the temperature to 300°F and be prepared for potential cracks.
Q: My cheesecake cracked despite following all instructions. How can I fix it? Don’t worry! Cracks don’t affect the taste. For a quick fix, top the cheesecake with fresh whipped cream, fruit compote, or ganache. For a seamless repair, combine 1/4 cup sour cream with 1 tablespoon sugar and 1/2 teaspoon vanilla, spread over the cooled cheesecake, and refrigerate until set.
Q: Can I use light cream cheese or Greek yogurt instead? For an authentic New York cheesecake, full-fat cream cheese is essential. Light versions contain additives that affect texture. If you must substitute, use no more than 8 ounces of Greek yogurt in place of one of the cream cheese blocks, but expect a slightly different texture.
Q: My graham cracker crust got soggy. What went wrong? Water likely seeped into your springform pan during the water bath. Use multiple layers of heavy-duty aluminum foil wrapped tightly around the pan, or try the oven bag method I mentioned in my secret tips.
Q: How can I tell when my cheesecake is perfectly done? The perfect cheesecake will still have a slight wobble in the center 2-3 inches when gently shaken. The edges should be set and slightly puffed. If you have an instant-read thermometer, the center should register 150°F (65°C).
Q: Can I make mini cheesecakes with this recipe? Absolutely! Use a muffin tin lined with paper liners and reduce the baking time to about 20-25 minutes. No water bath needed for minis, but do cool them gradually in the oven with the door cracked.
Q: My cheesecake browned too much on top. How can I prevent this? Your oven might run hot. Try reducing the temperature by 25°F next time. You can also place an empty baking sheet on the rack above the cheesecake to shield it from direct heat.
Q: How far in advance can I make cheesecake for a special occasion? Cheesecake is the perfect make-ahead dessert. It’s best made 1-2 days before serving, allowing flavors to develop in the refrigerator. For longer storage, freeze for up to 2 months and thaw overnight in the refrigerator.
Final Thoughts
The perfect New York cheesecake isn’t just about following a recipe—it’s about understanding the process. Each step, from bringing ingredients to room temperature to the gradual cooling, plays a crucial role in creating that signature dense, creamy texture that makes this dessert so iconic.
What I love most about this recipe is its reliability. Once you master these techniques, you’ll have a showstopping dessert in your repertoire that’s perfect for special occasions or whenever you need a little slice of luxury. There’s something deeply satisfying about creating a cheesecake that rivals those from famous New York bakeries—right in your own kitchen.
Remember that baking is both a science and an art. Don’t be discouraged if your first attempt isn’t perfect. Each cheesecake teaches you something new, and before long, you’ll develop the intuition that transforms good cheesecakes into unforgettable ones.
So heat up that oven, unwrap those cream cheese blocks, and prepare for a baking experience that’s as rewarding as the first heavenly bite of your homemade New York cheesecake.

